A Professional Guide to Installing Stair Runner & Decorative Stair Rods

A beautifully specified stair runner instantly transforms a staircase from a simple transition between floors into a central architectural feature. It introduces essential tactile texture, structural warmth, and an acoustic barrier that dampens footfall echoes.
To achieve a seamless, high-end finish that honours the craftsmanship of your home, the installation must be executed with absolute precision. This professional guide details the step-by-step methodology for installing custom-made stair runner alongside handmade, decorative stair rods and brackets.
All Woven Bliss rods and brackets are meticulously custom-made to order—each length cut precisely, finials shaped by hand, and finished to your exact specification. Whether your project features a classic straight flight, a sweeping curved architectural staircase, or a complex winder layout, this guide will ensure a flawless, professional installation.
Precision Tools & Premium Materials
| Tool / Material | Architectural Purpose | Technical Note |
| High-Power Drill | Creating precise pilot anchoring points | Select appropriate masonry or timber drill bits based on stair construction. |
| Flexible Tape Measure | Dimensional mapping | Essential for tracking the shifting geometries of curved or fanned stairs. |
| Stair Tool / Carpet Tucker | Mechanical wedge manipulation | Used to pack the runner tightly into the tread-and-riser junction for crisp folds. |
| Pneumatic Staple Gun / Heavy Tacks | Mechanical substrate anchoring | The gold standard for a permanent, secure bond into timber subfloors. |
| Crumbed Rubber Underlay | Kinetic impact absorption & pile protection | We specify 3mm or 5mm crumbed rubber underlay to maximize underfoot luxury. |
| Commercial Tack Strips (Carpet Grippers) | Directional tension anchoring | Positioned at the rear of each tread to lock the runner backing into position. |
| Polyurethane / Double-Sided Tape | Fluid chemical anchoring | The required mounting method for concrete, marble, or sensitive stone stairs. |
| Handmade Stair Rods & Brackets | Architectural jewelry & finishing detailing | Bespoke rods cut to order with custom-cast finials. |
Phase 1: Architectural Measurement & Calculations
Accurate mathematical mapping ensures your custom runner flows flawlessly without distortion or pattern misalignment.
1. Quantify the Step Unit
Measure the exact horizontal tread depth and the vertical riser height. If the staircase features a protruding nosing, measure the wrap distance tightly underneath it. Add these dimensions together to establish the unit rise.
2. Calculate Total Runner Length
$$L = (\text{Tread Depth} + \text{Riser Height}) \times \text{Number of Steps}$$
Always add 10% to 15% extra material to your final order calculation to accommodate necessary architectural tucking, trimming, and alignment adjustments. Include the full dimensions of any intermediate landings or turns.
3. Determine the Balanced Reveal
Measure the total width of your staircase. To achieve the perfect framing effect, subtract equal margins (reveals) on both sides—typically 50mm to 80mm of exposed timber or stone per side. The remaining dimension is your custom runner width.
Bespoke Rod Sizing Rule: To ensure a balanced visual scale, each decorative stair rod should be cut exactly 30mm to 50mm longer than the width of your runner, allowing the rod to rest comfortably between the bracket cups on either side.
4. Establish the Center Line Blueprint
Using a chalk line or light pencil, mark the absolute center point on every single tread and riser. This visual axis is critical for keeping the runner perfectly tracking straight throughout installation.
Phase 2: Substrate Preparation
Before laying any textile, prepare the subfloor to ensure long-term structural success.
- Decontaminate the Surface: Clean the stairs thoroughly, ensuring no paint drips, plaster residues, or protruding historical nails remain.
- Anchor the Shock Absorption Layer: Cut your premium 3mm or 5mm crumbed rubber underlay pads. Each pad must be cut slightly narrower than the runner width to remain completely hidden beneath the fabric. Fasten securely to the center of each tread.
- Position Tack Strips: Secure heavy-duty carpet grippers along the back crook of each tread, angled slightly toward the riser to clamp the rug backing tightly.
- Execute a Dry-Fit: Roll out the runner completely to verify visual alignment and repeat reveals against your center marks before applying final physical anchors.
Phase 3: Fitting the Runner on Straight Stairs
Choose the anchoring methodology that respects your subfloor material: use a pneumatic staple gun or tacks for timber stairs, and specify high-strength polyurethane adhesive or structural double-sided tape for sensitive concrete, marble, or underfloor-heated stone stairs.
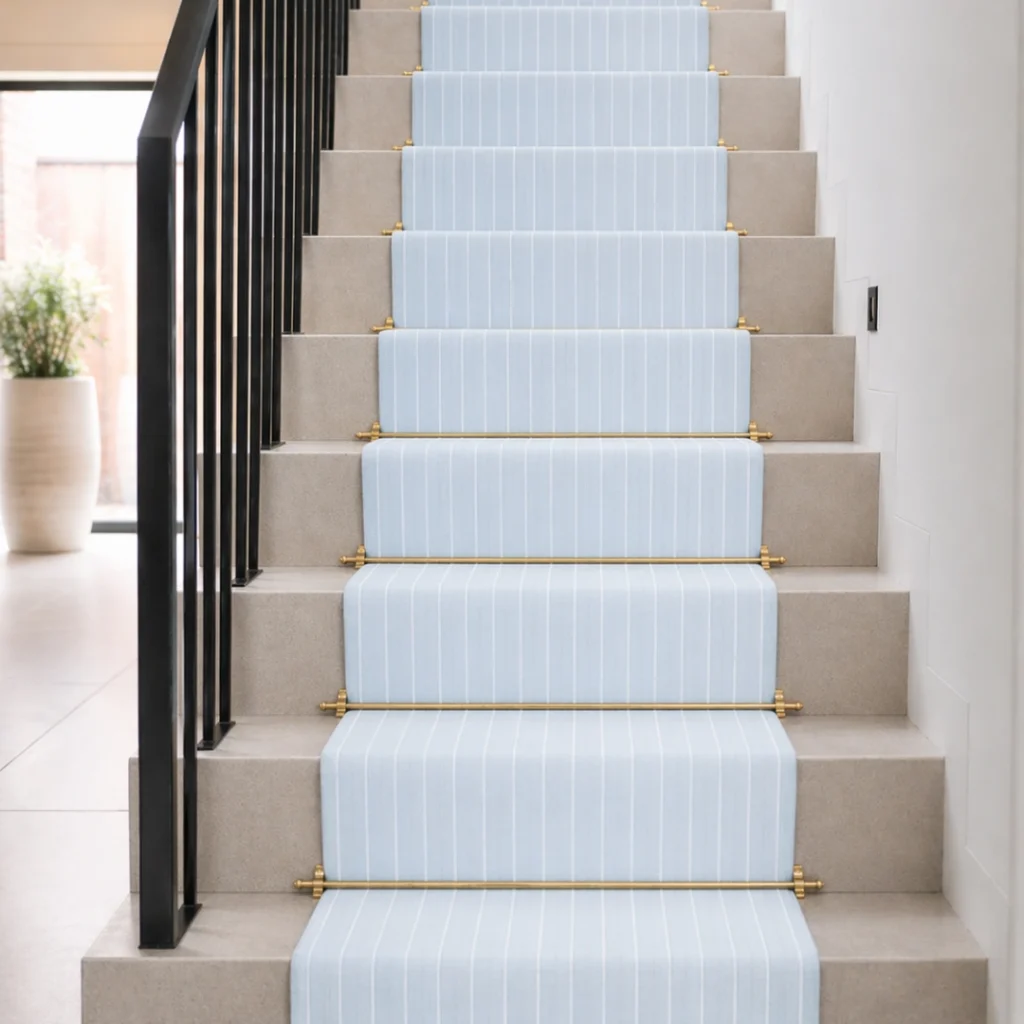
- The Initial Top Anchor: Start at the absolute top of the flight. Align the runner precisely against your center marks. Fold the top raw edge under itself and secure it firmly right beneath the top nosing or top riser.
- The Tension Tuck Downward: Working downward one step at a time, use your heavy iron stair tool to wedge the runner tightly into the crease where the tread meets the riser.
- Locking the Riser Base: Drive staples or anchors into the base of the riser at 75mm intervals, ensuring the runner remains perfectly taut across the tread.
- The Bottom Finish: At the base of the final step, fold any remaining excess material neatly underneath the last riser edge and drive clean anchors for an unblemished, crisp boundary.
Phase 4: Navigating Complex Geometries (Curved & Winder Stairs)
Curved, fanned, or winder staircases present a shifting geometry where each step features a completely different width, angle, and radius.
- Establish the Flow Line: Do not try to measure from the walls. Instead, map out a continuous, fluid visual center line down the curve using a flexible measuring tape or string. This represents the architectural path your runner will track.
- Individual Step Mapping: Measure every single fanned tread independently. Record the narrow inner edge width, the expansive outer edge width, the riser height, and the deep center tread depth.
- Construct Craft Templates: We highly recommend creating exact 1:1 paper templates for each curved step. Mark each template clearly (e.g., “Winder Curve Step 1”) and test-fit them on the staircase before modifying your runner.
- Tension Management on Bends: Start installing from the top of the curve downward. Follow your flow line relentlessly. Because the outer radius requires more fabric than the inner radius, allow the runner to flow naturally. To prevent backing buckle, you can make tiny, strategic relief cuts only in the backing matrix (never into the visible face pile). Secure each tread and riser individually before moving to the next.
Phase 5: Installing Handmade Decorative Stair Rods
Woven Bliss custom stair rods are luxurious architectural embellishments. They are purely decorative and designed to enhance your interior style; they are not structural and do not hold the runner in place.
- Position the Brackets: Place your hand-finished bracket cups on either side of the runner, resting snugly in the junction where the tread meets the riser. Mark the screw locations. For curved or winder configurations, ensure the brackets are installed parallel to the runner’s edge, following the visual flow of the carpet rather than the uneven angles of the stair walls.
- Drill Pilot Holes: Especially when working with dense South African hardwoods like Rhodesian Teak or sensitive concrete, always drill precise pilot holes to avoid splitting the timber or cracking the subfloor.
- Mount the Structural Hardware: Drive the screws firmly to lock the brackets into position, avoiding over-tightening which can strip the threads.
- Insert the Rod & Secure Finials: Slide your custom-cut rod—whether polished brass, brushed stainless steel, or raw mild steel—through both brackets. The rod should rest gently against the carpet pile. Attach your hand-shaped finials to the ends and lock them down using the integrated set screws.
- The Exhibition Polish: Wipe down the entire installation with a clean microfiber cloth to remove skin oils and layout marks, ensuring the metal finishes catch the light perfectly.

Technical Troubleshooting
| Structural Symptom | Root Cause | Professional Solution |
| Runner drifts off center line | Uneven manual tension or inaccurate initial mapping | Release the recent step anchors, re-align the center markings, and re-apply tension uniformly. |
| Wrinkling or bubbling on curves | Overly thick underlay or lack of backing relief | Eliminate heavy underlay on tight bends. Make small, parallel relief slits in the backing matrix to let the fabric relax. |
| Visible gaps at the edge profile | Uneven reveals or shifting angles | Adjust the bracket reveal margins to mask minor discrepancies in the staircase width. |
| Rods look misaligned or crooked | Brackets anchored to the wall profile instead of tracking the runner | Remove brackets and re-align them so they sit perfectly square to the runner’s edge. |
⚠️ Professional Installation Disclaimer
Stair runner installation—particularly across winding, fanned, or sweeping helical architectures—requires advanced spatial calculation, carpet manipulation skills, and precision tools. Improper tensioning, incorrect anchoring, or standard retail underlays can lead to permanent textile warping, unsafe slipping hazards, or irreversible damage to underlying hardwood and stone. While this guide details professional techniques, we strongly recommend commissioning a certified, professional carpet installer to execute the physical fitment of your custom textiles. Woven Bliss assumes no liability for structural damage or personal injury resulting from independent installation attempts.
Final Thoughts: An Heirloom Transformation
A meticulously installed custom runner paired with hand-finished metal rods is an investment that immediately elevates the architectural narrative of your home. By respecting centre lines, specifying premium crumbed rubber underlay, and treating fanned stairs with individual templates, you create a breath taking, durable transition that stands the test of time.
Ready to specify your custom staircase renovation? Explore our Stair Runner collections, custom rugs and runners, customize your brass hardware, or book a Free Consultation with Woven Bliss today to discuss your measurements.